Showing posts with label frugal. Show all posts

Saturday, October 13, 2012

I started baking our daily bread once again.  

It's something I've done off and on for years, but I've never been satisfied with the texture and crust.  

Until know.  I tried something on a whim and it worked better then I expected.  I will never-ever go back to store bought bread.  =)


Look at that HUGE rise!


I mix and knead the bread in the bread machine (Dough Cycle), pop it in the refrigerator to rise over night, and then bake it in the morning.  That is it ... So.Incredibly.Simple.

Whole Grain Sandwich Bread
1 cup warm water
1 tablespoon milk 
2 tablespoons oil (I use coconut oil)
4 tablespoons honey (or brown sugar)
1 teaspoon salt
2 cups unbleached bread flour
1 cup whole wheat or spelt flour
2 teaspoons yeast

Mix and knead on Dough Cycle (usually takes 2 hours and includes 1 rise).
Turn out onto lightly floured surface and shape into oblong loaf.
Grease loaf pan, plop in dough, and turn dough to grease all sides.
Cover with plastic wrap and put in refrigerator to rise overnight.

Preheat oven to 325 degrees.
Bake 30 minutes or until bottom of loaf sounds hollow when tapped.
Turn out of pan immediately and cool on wire rack.


Two little things ... 

I like to smear the top of the bread with butter as soon as I take it out of the oven.  
This helps keep the crust soft.  

I absolutely LOVE my bread pans!!!  They make all the difference and I'm so glad my sister suggested I buy them.  They are made by Norpro and you can get them on Amazon.  Or at an Amish Store, like I did.  =)

Happy Baking!

Erin


Monday, August 22, 2011

Saturday, August 13, 2011

Putting up Peaches

Love Bug and I picked up 1/2 bushel of Red Haven Peaches this week and I processed them in record time!

(16) 1 pound containers in the freezer

You have to add  lemon juice & a liquid to cover the peaches so they don't turn brown.  I used Apple Juice instead of a simple syrup.  Gpa Mellema always used Orange Juice.  =)


Peach Jam

Those wide mouth 1/2 pint jars in the front are my FAVORITE for jamming!

Note to self ... the dark color of Raw Sugar turns the jam from a bright peach to a pumpkin orange.  Next year use Evaporated Cane Juice Crystals.  =)

Friday, April 30, 2010

Frugal Recipe Binder

I have tried just about every possible system for storing and organizing recipes:
  • Plastic box with tabbed dividers - it would get stuffed quickly and the top wouldn't close properly.  =(
  • Binder with tabs and sheet protectors - larger capacity for recipes.  =)  The sheet protectors were pricey and it never fit nicely on my cookbook shelf =(
  • Filing them on the computer - good idea in concept because you aren't wasting printer paper. =)   How many of us want the laptop in the middle of a hot, messy kitchen?  =(
This is no good!  There must be a better solution!  Thinking.  Thinking.  Thinking.  Aha ... I've got it!  A trip to the thrift store and $3.00 later -- my problem was solved.


It's an old style photo album.  I actually bought two of them for 50 cents because I wanted more photo pages.  I kept this binder because the flowers, striped pattern and scallops reminded me of an old-fashioned kitchen.

I bought stick-on index tabs from Wal-Mart for $2.00.  They are in the office supply section by the post it notes, index cards, thumb tacks, and such.  I already had the  index cards but if you don't, check out the $1 section of Michael's Arts & Crafts for some really fun ones.  =)  The 4x6 size card fits perfectly in the photo album. 

Wouldn't this be a fun project to do with a budding young homemaker this summer?  You could make a day of it.  =)

A trip to a thrift shop or two for the photo album.  Follow that up with a quick jaunt into Wal-Mart for the stick on tabs.  Make sure you put on your blinders or you might get sucked in to the WM time warp and not come out until supper time!!!  LOL.  If you don't already have them, buzz into Michael's and pick out the prettiest recipe cards you can find in the $1 section.  They usually have several styles from which to choose.  On your way home, stop at McDonald's for $1 Hot Fudge Sundaes, so that you will be well nourished for your creative afternoon.  =)   Put on some nice music and enjoy a nice chat while you work together.

I would love to see pictures of your finished Frugal Recipe Binders so send them to erin1978 at gmail dot com.


Monday, June 02, 2008

Teacher Gifts

Abigail's last day of pre-school is Thursday so this weekend I've kept my hands busy knitting Teacher Gifts. One for Mrs. Bradley and one for Mrs. Meers. They will be tucked in a gift bag along with some of my wonderfully frugal coupon shopping items. =)


God Bless,

ERIN =)

Monday, May 12, 2008

RECIPE - Spanish Potatoes

This recipe comes from the cookbook Miserly Meals by Jonni McCoy. She is also the author of Miserly Moms which was the first "frugal" book that I checked out of the library when I began my journey to simple living 4 1/2 years ago. =)

SPANISH POTATOES
Serves 4
Prep Time: 1 hour, 15 minutes
Cook Time: 5 minutes
Approximate cost per serving (1 filled potato): $.59

4 large potatoes
1/2 pound lean ground beef
1/4 teaspoon chili powder
1/4 cup diced onion
3 cloves garlic, pressed
1/2 teaspoon Tabasco sauce
6 ounces tomato sauce
3/4 cup grated cheddar cheese

Bake the potatoes at 425 degrees (or microwave) until tender in the center. Cut each potato in half lengthwise, then scoop out the center of each potato with a spoon, being careful not to cut into the skin. Place the potato pulp in a large mixing bowl.

Brown the ground beef in a skillet. Drain the beef. Add the beef to the bowl with the potato pulp. Add the chili powder, onion, garlic, Tabasco sauce, and tomato sauce. Mix well.

Stuff the potato shells with the potato-meat mixture. It will be heaping out of the skins. Sprinkle 3 tablespoons of cheese over the top of each potato. Place the potatoes on a cookie sheet, and return to the oven for 2-3 minutes to melt cheese.

Edited to add picture of tonight's supper.

God Bless,

ERIN =)

Thursday, May 08, 2008

How to Draft a Cloth Diaper Pattern

These are the supplies that you need to draft a diaper pattern:
Paper grocery bag, ruler/yard stick, pencil, eraser, sharpie marker,
and several Tupperware lids and containers.


Cut open the paper grocery bag and fold out all the seams so that it lays flat.


Take your child's measurements over a diaper. The waist measurement is taken at the belly button. The rise measurement is taken from the belly button, down through the legs, and up the back to where the belly button would be if it was on the back.


Now reference lines need to be drawn. I line up my ruler along the vertical seam in the bag and make a line 16 inch long. This is the crotch. At the top of the line I make another line perpendicular to it. I measure out 9 inches each way. This is the waist measurement (9+9=18 inches). On the other end of the vertical line, I mark the tummy panel line, which is 1/2 the size of the waist measurement or 9 inches.


All reference lines are made and the measurement notations are made on the grocery sack: Waist = 18"/ Rise = 16"/ Tummy = 9"; **NOTE: I used a sharpie marker so that you could see the lines in the photos, but I would recommend using a pencil first and when the entire pattern is drafted, go over it with a sharpie.**


Divide the rise reference line measurement by 2 (8") and make a small tick mark.


Then measure down 1 1/2 - 2 inches down from that mark and make another tick mark. This is the crotch line. The back part of the diaper needs to be loner to accommodate the baby's tushy. If you have a boy, you might want to place the crotch line right in the middle of the rise reference line to accommodate his "equipment".


Draw your crotch line. I like my diaper's to be quite trim through the crotch, so I made it 5 inches. A nice reference list of diaper measurements can be found here.


Take a medium sized Tupperware bowl or lid and draw the front panel to crotch curves. I used the same lid for both convex and concave curves. You can take another small Tupperware lid or bowl and curve the front panel line so that it isn't square, but I like to keep my pattern like this. It makes it easier to adapt to a pocket diaper.


Use a small Tupperware lid or bowl (I think the snack cup works perfectly) to draw the wasit tabs. You can either line up the cup with the end of the line and draw the curve . . . . OR


. . . Line up the cup so that the curve merges with the end of the line and draw. This application is best suited if you want to have cross-over tabs.


Take a large Tupperware lid or bowl and draw lines to connect the crotch line to the tabs.


Now your pattern is done! Almost . . .


If you are using knit fabrics for your diaper, cut out the pattern as is. If you are using wovens, you need to add a seam allowance. Rubber band 2 pencils together and run them along the outside lines of your diaper. This will give you a perfect 1/4 inch seam allowance. =)


Cut out your diaper pattern - this pattern is for knits.


Fold in half to make sure all curves are symmetrical.
My tabs weren't so I trimmed them to be the same.


The elastic placement needs to be marked next. Fold up the tummy panel to line up with the crotch line. Make little marks at these folds close to the edge of the pattern.


I like to use a hole punch to mark my elastic placements.
Then I can just dot the fabric with a wash-away pen.


I find the waist elastic measurement by taking 1/2 of the waist measurement, divide it by 3, and measure in that amount from the back tabs. Make a mark with a pen or by punching a hole.

Take the ruler and measure straight down to the bottom of the waist tab and make a mark with a pen or by punching a hole.

Here is the diaper pattern with all elastic measurements marked and cut out.
Remember your measurements may be different then mine.
Good luck on drafting your own pattern and happy sewing!

God Bless,

ERIN =)


Tuesday, May 06, 2008

TUTORIAL TUESDAY ~ Cloth Diaper Pattern

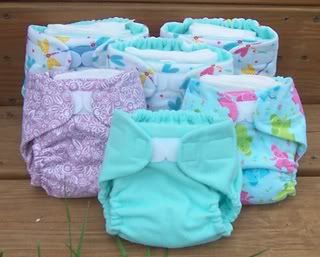
I learned about cloth diapers when I was pregnant with Abigail from my cousin Lisa. She said that they are very easy to sew and that intrigued me because I like to sew. I started researching them on the Internet (whoa, there is a lot of info!), bought several patterns, and made my newborn stash. When it was time to size up to small cloth diapers, I decided to try and draft my own pattern. It worked really well so I decided to write a tutorial so that other cloth diapering mamas could do the same. That was over 3 years ago and it's had over 130,000 views since then. =) Over the course of the next few days, I'm going to copy it over to my blog and put a link in my sidebar so it is easy to find.

God Bless,

ERIN

Saturday, April 12, 2008

Italian Cooking Sauce

Making a pot 'o' sauce is lovely Saturday morning project. It only takes 5-10 minutes of prep and an hour of low simmer to make. It is very freezer or canning friendly. The recipe comes from ... you guessed ... Make A Mix by Karin Eliason:

Italian Cooking Sauce
2 (14.5 ounce) cans stewed tomatoes, pureed (I just buy crushed tomatoes)
4 (8 ounce) cans tomato sauce
2 cups water
2 (6 ounce) cans tomato paste
2 tablespoons dried minced onion (I usually saute' 1/2 a finely minced onion in a bit of EVVO)
2 tablespoons parsley flakes
1 tablespoon salt
2 tablespoons cornstarch
4 teaspoons dried green pepper flakes (I can't find these so I just saute' 1/2 a finely minced green pepper along with the onion)
1/4 teaspoon garlic powder
1 1/2 teaspoon Italian seasoning

Saute onion and green pepper in a bit of EVVO until onion is translucent in a large stock pot or Dutch oven. Add remaining ingredients and simmer for a minimum of 15 minutes, but an hour is better. Cool. Divide into freezer containers (or can it in a water bath). Makes 6 pints.

I use this sauce for Lasagna, Homemade Meatballs, and Pizza Sauce. It tastes so much better then store-bought sauce and very easy to make.

God Bless,

ERIN

(PS - That is a picture of the sauce I made on Saturday)

LinkWithin

Related Posts Plugin for WordPress, Blogger...