
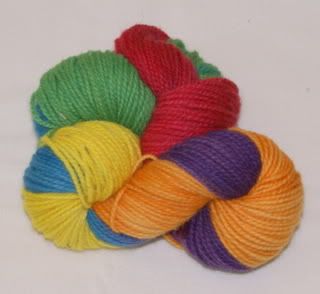
Such beautiful fabric! Sue has an excellent sense of color.

These lovely fabrics will turn into this quilt. It's going to be my big project for 2009. I promise to post lots and lots of progress pictures. =)

God Bless,
ERIN

 I'm enjoying the summer with my Abigail. We made three trips to visit my sister Sarah in New York with each trip lasting almost a week. We made our yearly summer trip to Michigan to visit family and friends. I've been cooking a good bit and Mr. K is loving it. I bought a pressure canner and I did a couple "practice" runs before applesauce season arrives. I started working on knitted Christmas presents. Abigail and I are listening to the Anne of Green Gables series on CD and loving it immensely. Once Abigail starts pre-k (September 10th), I will start blogging more. Thank you for all the kind comments you have left this summer.
 I love, love, love GLASS CANNING JARS and find they work so well in my pantry. I've purchased them all at thrift stores so I didn't spend a lot of money switching from plastic containers to glass jars.

 WHEN: June 2, 2008 - August 30, 2008


 Mr. K and I celebrated our 12th anniversary yesterday.


 Edited to add picture of tonight's supper.
 These are the supplies that you need to draft a diaper pattern:
 Cut open the paper grocery bag and fold out all the seams so that it lays flat.
 Take your child's measurements over a diaper. The waist measurement is taken at the belly button. The rise measurement is taken from the belly button, down through the legs, and up the back to where the belly button would be if it was on the back.
 Now reference lines need to be drawn. I line up my ruler along the vertical seam in the bag and make a line 16 inch long. This is the crotch. At the top of the line I make another line perpendicular to it. I measure out 9 inches each way. This is the waist measurement (9+9=18 inches). On the other end of the vertical line, I mark the tummy panel line, which is 1/2 the size of the waist measurement or 9 inches.
 All reference lines are made and the measurement notations are made on the grocery sack: Waist = 18"/ Rise = 16"/ Tummy = 9"; **NOTE: I used a sharpie marker so that you could see the lines in the photos, but I would recommend using a pencil first and when the entire pattern is drafted, go over it with a sharpie.**
 Divide the rise reference line measurement by 2 (8") and make a small tick mark.
 Then measure down 1 1/2 - 2 inches down from that mark and make another tick mark. This is the crotch line. The back part of the diaper needs to be loner to accommodate the baby's tushy. If you have a boy, you might want to place the crotch line right in the middle of the rise reference line to accommodate his "equipment".
 Draw your crotch line. I like my diaper's to be quite trim through the crotch, so I made it 5 inches. A nice reference list of diaper measurements can be found here.
 Take a medium sized Tupperware bowl or lid and draw the front panel to crotch curves. I used the same lid for both convex and concave curves. You can take another small Tupperware lid or bowl and curve the front panel line so that it isn't square, but I like to keep my pattern like this. It makes it easier to adapt to a pocket diaper.
 Use a small Tupperware lid or bowl (I think the snack cup works perfectly) to draw the wasit tabs. You can either line up the cup with the end of the line and draw the curve . . . . OR
 . . . Line up the cup so that the curve merges with the end of the line and draw. This application is best suited if you want to have cross-over tabs.
 Take a large Tupperware lid or bowl and draw lines to connect the crotch line to the tabs.
 Now your pattern is done! Almost . . .
 If you are using knit fabrics for your diaper, cut out the pattern as is. If you are using wovens, you need to add a seam allowance. Rubber band 2 pencils together and run them along the outside lines of your diaper. This will give you a perfect 1/4 inch seam allowance. =)
 Cut out your diaper pattern - this pattern is for knits.
 Fold in half to make sure all curves are symmetrical.
 The elastic placement needs to be marked next. Fold up the tummy panel to line up with the crotch line. Make little marks at these folds close to the edge of the pattern.
 I like to use a hole punch to mark my elastic placements.
 I find the waist elastic measurement by taking 1/2 of the waist measurement, divide it by 3, and measure in that amount from the back tabs. Make a mark with a pen or by punching a hole.
 Take the ruler and measure straight down to the bottom of the waist tab and make a mark with a pen or by punching a hole.
 Here is the diaper pattern with all elastic measurements marked and cut out.